
به آموزش راه اندازی وب سرور ESP32خوش اومدید.
تو این آموزش نحوه راه اندازی وب سرور تکی برای ESP32 که دو خروجی (دو تا LED) رو در آردوینو کنترل می کنه یاد می گیریم. این وب سرور در موبایل پیاده سازی میشه و با هر دستگاه دیگه ای که مرورگر داشته باشه قابل دسترسه.
اطلاعات کلی راجه به پروژه بیان کنیم :
- این وب سرور به دو GPIO26 و GPIO27 متصل شده و دو تا LED رو میخواد کنترل کنه.
- با نوشتن ESP32 IP ADDRESS در یک مرورگری در شبکه محلی میتونید به وب سرورتون دسترسی پیدا کنید.
- با زدن کلیدها در وب سرور میتونید وضعیت هر کدوم از LED ها رو تغییر بدید.
چه قطعاتی نیاز داریم ؟
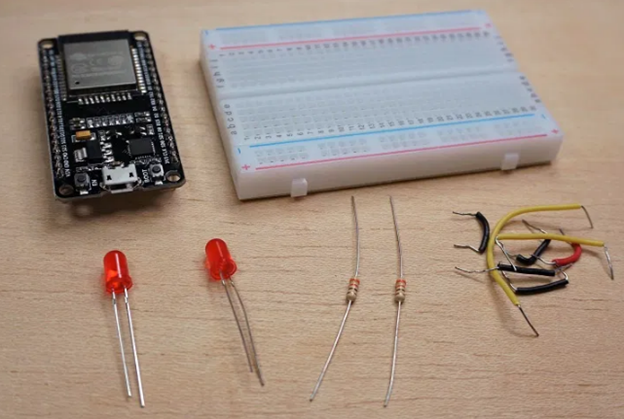
- ESP32 DOIT DEVKIT V1 Board
- ۲ تا LED mm5
- ۲ تا مقاومت ۳۳۰ اهم
- بِردبُرد
- سیم جامپر
شماتیک مدار
دو LED رو مطابق شکل زیر به دو GPIO وصل کنید.

کد وب سرور ESP32
این کد رو در ARDUINO IDE کپی کنید اما هنوز نیاز به تغییراتی داره . آپلود نکنید .
/*********
  Rui Santos
  Complete project details at https://randomnerdtutorials.com
*********/

// Load Wi-Fi library
#include <WiFi.h>

// Replace with your network credentials
const char* ssid = "REPLACE_WITH_YOUR_SSID";
const char* password = "REPLACE_WITH_YOUR_PASSWORD";

// Set web server port number to 80
WiFiServer server(80);

// Variable to store the HTTP request
String header;

// Auxiliar variables to store the current output state
String output26State = "off";
String output27State = "off";

// Assign output variables to GPIO pins
const int output26 = 26;
const int output27 = 27;

// Current time
unsigned long currentTime = millis();
// Previous time
unsigned long previousTime = 0;
// Define timeout time in milliseconds (example: 2000ms = 2s)
const long timeoutTime = 2000;

void setup() {
  Serial.begin(115200);
  // Initialize the output variables as outputs
  pinMode(output26, OUTPUT);
  pinMode(output27, OUTPUT);
  // Set outputs to LOW
  digitalWrite(output26, LOW);
  digitalWrite(output27, LOW);

  // Connect to Wi-Fi network with SSID and password
  Serial.print("Connecting to ");
  Serial.println(ssid);
  WiFi.begin(ssid, password);
  while (WiFi.status() != WL_CONNECTED) {
    delay(500);
    Serial.print(".");
  }
  // Print local IP address and start web server
  Serial.println("");
  Serial.println("WiFi connected.");
  Serial.println("IP address: ");
  Serial.println(WiFi.localIP());
  server.begin();
}

void loop(){
  WiFiClient client = server.available();   // Listen for incoming clients

  if (client) {                             // If a new client connects,
    currentTime = millis();
    previousTime = currentTime;
    Serial.println("New Client.");          // print a message out in the serial port
    String currentLine = "";                // make a String to hold incoming data from the client
    while (client.connected() && currentTime - previousTime <= timeoutTime) {  // loop while the client's connected
      currentTime = millis();
      if (client.available()) {             // if there's bytes to read from the client,
        char c = client.read();             // read a byte, then
        Serial.write(c);                    // print it out the serial monitor
        header += c;
        if (c == '\n') {                    // if the byte is a newline character
          // if the current line is blank, you got two newline characters in a row.
          // that's the end of the client HTTP request, so send a response:
          if (currentLine.length() == 0) {
            // HTTP headers always start with a response code (e.g. HTTP/1.1 200 OK)
            // and a content-type so the client knows what's coming, then a blank line:
            client.println("HTTP/1.1 200 OK");
            client.println("Content-type:text/html");
            client.println("Connection: close");
            client.println();

            // turns the GPIOs on and off
            if (header.indexOf("GET /26/on") >= 0) {
              Serial.println("GPIO 26 on");
              output26State = "on";
              digitalWrite(output26, HIGH);
            } else if (header.indexOf("GET /26/off") >= 0) {
              Serial.println("GPIO 26 off");
              output26State = "off";
              digitalWrite(output26, LOW);
            } else if (header.indexOf("GET /27/on") >= 0) {
              Serial.println("GPIO 27 on");
              output27State = "on";
              digitalWrite(output27, HIGH);
            } else if (header.indexOf("GET /27/off") >= 0) {
              Serial.println("GPIO 27 off");
              output27State = "off";
              digitalWrite(output27, LOW);
            }

            // Display the HTML web page
            client.println("<!DOCTYPE html><html>");
            client.println("<head><meta name=\"viewport\" content=\"width=device-width, initial-scale=1\">");
            client.println("<link rel=\"icon\" href=\"data:,\">");
            // CSS to style the on/off buttons
            // Feel free to change the background-color and font-size attributes to fit your preferences
            client.println("<style>html { font-family: Helvetica; display: inline-block; margin: 0px auto; text-align: center;}");
            client.println(".button { background-color: #4CAF50; border: none; color: white; padding: 16px 40px;");
            client.println("text-decoration: none; font-size: 30px; margin: 2px; cursor: pointer;}");
            client.println(".button2 {background-color: #555555;}</style></head>");

            // Web Page Heading
            client.println("<body><h1>ESP32 Web Server</h1>");

            // Display current state, and ON/OFF buttons for GPIO 26
            client.println("<p>GPIO 26 - State " + output26State + "</p>");
            // If the output26State is off, it displays the ON button
            if (output26State=="off") {
              client.println("<p><a href=\"/26/on\"><button class=\"button\">ON</button></a></p>");
            } else {
              client.println("<p><a href=\"/26/off\"><button class=\"button button2\">OFF</button></a></p>");
            }

            // Display current state, and ON/OFF buttons for GPIO 27
            client.println("<p>GPIO 27 - State " + output27State + "</p>");
            // If the output27State is off, it displays the ON button
            if (output27State=="off") {
              client.println("<p><a href=\"/27/on\"><button class=\"button\">ON</button></a></p>");
            } else {
              client.println("<p><a href=\"/27/off\"><button class=\"button button2\">OFF</button></a></p>");
            }
            client.println("</body></html>");

            // The HTTP response ends with another blank line
            client.println();
            // Break out of the while loop
            break;
          } else { // if you got a newline, then clear currentLine
            currentLine = "";
          }
        } else if (c != '\r') {  // if you got anything else but a carriage return character,
          currentLine += c;      // add it to the end of the currentLine
        }
      }
    }
    // Clear the header variable
    header = "";
    // Close the connection
    client.stop();
    Serial.println("Client disconnected.");
    Serial.println("");
  }
}
تنظیمات اعتبار شبکه
تغییراتی که در کد نیاز هست ایجاد بشه مربوط به SSID و پسورد هست و فقط لازمه این دو خط رو در کد جایگزین کنید :
// Replace with your network credentials
const char* ssid     = "REPLACE_WITH_YOUR_SSID";
const char* password = "REPLACE_WITH_YOUR_PASSWORD";
آپلود کردن کد
طبق مراحل زیر کد رو آپلود کنید :
ESP32 رو به کامپیوتر متصل کنید.
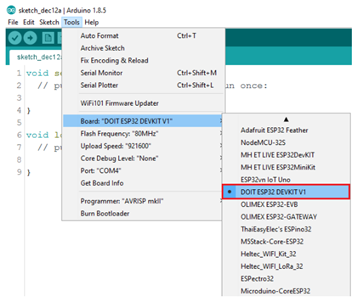
در ARDUINO IDE برد رو از قسمت tools => board پیدا کنید.
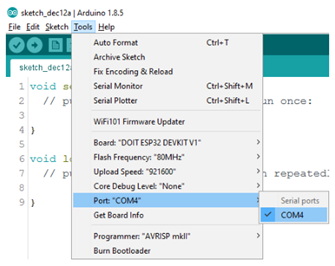
پورت COM رو از tools => port انتخاب کنید.
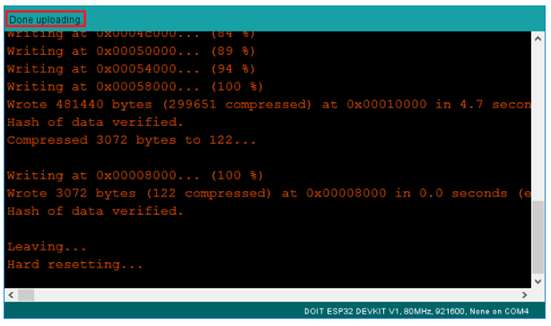
کلید آپلود رو بزنید و بعد از چند ثانیه کامپایل و آپلود میشه.
تا زمان دیدن پیام “Done Uploading ” صبر کنید.

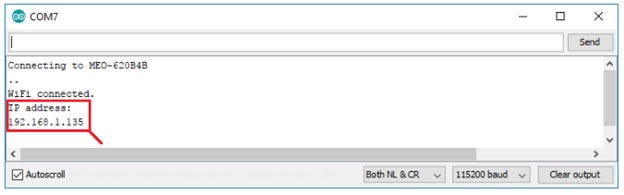
پیدا کردن ESP IP ADDRESS
بعد از آپلود کردن کد مانیتور سریال رو در بادریت ۱۱۵۲۰۰ قرار بدید.

کلید EN (ریست) رو بزنید . ESP32 به WIFI متصل میشه و در خروجی ESP IP ADDRESS رو در مانیتور سریال نمایش میده. این آی پی رو کپی کنید.
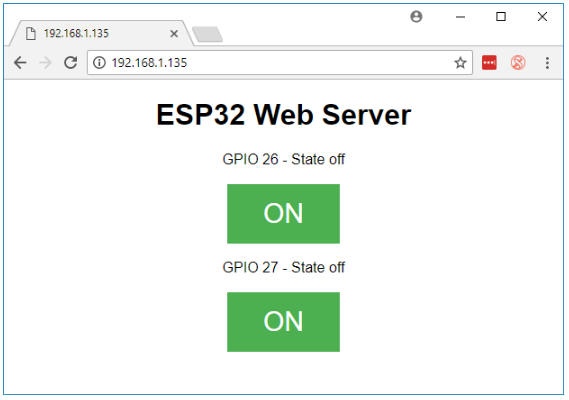
دسترسی به وب سرور
آی پی که در مرحله قبل کپی کردید در مرورگر پیست کنید، این پیج رو تو مرحله بعد میبینید.
۱۹۲.۱۶۸.۱.۳۵
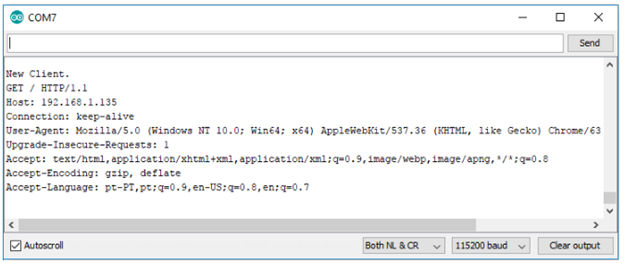
با دیدن مانیتور متوجه میشیم که ESP درخواست HTTP از کاربر(اینجا مرورگر شماست) دریافت میکنه.
تست وب سرور
برای تست اینکه وب سروری که طراحی کردین درست کار می کنه یا نه با کلیدها LED ها رو کنترل کنید.
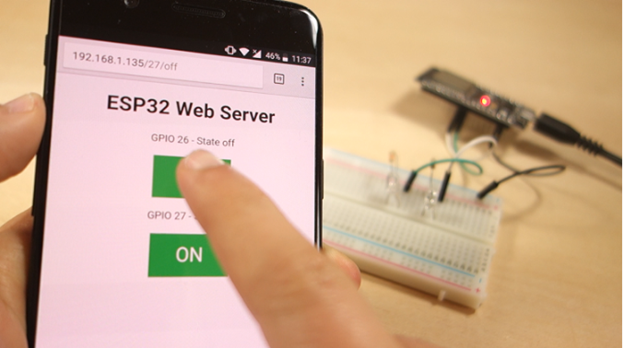
همزمان مانیتور رو هم نگاه کنید که چه اتفاقی داره میفته. مثلا وقتی کلید رو میزنید تا GPIO26 رو فعال کنید، ESP32 درخواستی با آدرس ۲۶/ON دریافت میکنه.
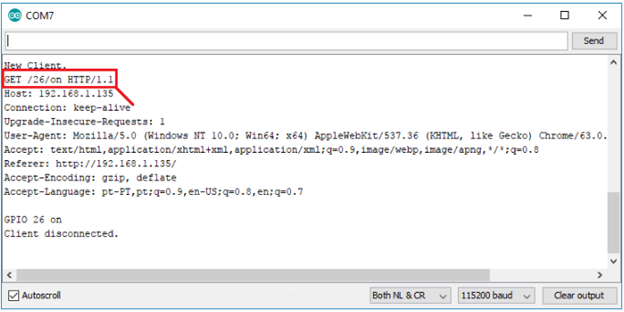
وقتی ESP32 این درخواست رو دریافت میکنه ، LED که به GPIO26 متصله رو روشن می کنه و وضعیتش رو در صفحه سرور آپدیت می کنه. کلید مربوط به GPIO27 هم به همین صورته.

کد برنامه چطور کار می کنه ؟
تو خط اول کتابخونه مربوط به WIFI نوشته میشه.
#include <WiFi.h>
SSID و پسورد رو در کوتیشن مقدار میدیم.
const char* ssid = "";
const char* password = "";
حالا مرورگر به پورت ۸۰ متصل میشه.
WiFiServer server(80);
در خط های بعدی متغیری که در درخواست HTTP ایجاد میشه رو ذخیره می کنیم.
String header;
تو مرحله بعد متغیر های کمکی رو برای ذخیره حالت فعلی خروجی ها ایجاد می کنیم.
String output26State = "off";
String output27State = "off";
حالا GPIOها رو به خروجی ها متصل می کنیم.
const int output26 = 26;
const int output27 = 27;
()setup
برای عیب یابی کردن لازمه ارتباط سریال رو در بادریت ۱۱۵۲۰۰ تنظیم کنیم.
Serial.begin(115200);
GPIOها رو به عنوان خروجی و در حالت LOW تعریف می کنیم.
// Initialize the output variables as outputs
pinMode(output26, OUTPUT);
pinMode(output27, OUTPUT);

// Set outputs to LOW
digitalWrite(output26, LOW);
digitalWrite(output27, LOW);
تو خط های بعدی اتصال WIFI رو با دستور WiFi.begin(ssid, password) تنظیم می کنیم و تا اتصال کامل و دیدن ESP IP ADDRESS در مانیتور صبر می کنیم.
// Connect to Wi-Fi network with SSID and password
Serial.print("Connecting to ");
Serial.println(ssid);
WiFi.begin(ssid, password);
while (WiFi.status() != WL_CONNECTED) {
  delay(500);
  Serial.print(".");
}
// Print local IP address and start web server
Serial.println("");
Serial.println("WiFi connected.");
Serial.println("IP address: ");
Serial.println(WiFi.localIP());
server.begin();
()loop
در loop اتفاقهایی که بعد از ارسال درخواست کاربرها به وب سرور میفته برنامه ریزی می شه. ESP همیشه آماده دریافت درخواست کاربرهاشه! تو کد خط بعدی این تنظیم شده.
WiFiClient client = server.available(); // Listen for incoming clients
وقتی درخواستی از کاربری دریافت میشه اطلاعات باید ذخیره بشه. تا زمانی هم که کاربر برای درخواست متصل شده ، حلقه while اجرا میشه.
if (client) { // If a new client connects,
  Serial.println("New Client."); // print a message out in the serial port
  String currentLine = ""; // make a String to hold incoming data from the client
  while (client.connected()) { // loop while the client's connected
    if (client.available()) { // if there's bytes to read from the client,
      char c = client.read(); // read a byte, then
      Serial.write(c); // print it out the serial monitor
      header += c;
      if (c == '\n') { // if the byte is a newline character
      // if the current line is blank, you got two newline characters in a row.
      / that's the end of the client HTTP request, so send a response:
        if (currentLine.length() == 0) {
        // HTTP headers always start with a response code (e.g. HTTP/1.1 200 OK)
        // and a content-type so the client knows what's coming, then a blank line:
          client.println("HTTP/1.1 200 OK");
          client.println("Content-type:text/html");
          client.println("Connection: close");
          client.println();
در بخش بعدی کدهای if و else براساس اینکه چه کلیدی تو سرور زده شده خروجی ها کنترل میشن.
// turns the GPIOs on and off
if (header.indexOf("GET /26/on") >= 0) {
  Serial.println("GPIO 26 on");
  output26State = "on";
  digitalWrite(output26, HIGH);
} else if (header.indexOf("GET /26/off") >= 0) {
  Serial.println("GPIO 26 off");
  output26State = "off";
  digitalWrite(output26, LOW);
} else if (header.indexOf("GET /27/on") >= 0) {
  Serial.println("GPIO 27 on");
  output27State = "on";
  digitalWrite(output27, HIGH);
} else if (header.indexOf("GET /27/off") >= 0) {
  Serial.println("GPIO 27 off");
  output27State = "off";
  digitalWrite(output27, LOW);
}
با زدن هر کدوم از کلیدها درخواست روی آدرس های متفاوتی ارسال میشه. مثلا اگه کلید GPIO26 ON رو بزنید، ESP32 درخواست رو در آدرس ۲۶/ON دریافت میکنه .اطلاعات آدرس رو در هدر میتونیم ببینیم. اگر تو این اطلاعات عبارت GET/26/ON دیده بشه وضعیت متغیر output26state رو به ON تغییر میدیم و ESP هم LED رو روشن می کنه.
به همین شکل اگه کلیدهای دیگه ای هم زده بشه و بخوایم خروجی های دیگه رو کنترل کنیم کافیه کد مربوط به اون خروجی رو تغییر بدیم.
نمایش صفحه وب HTML
کار دیگه ای که لازمه انجام بدین اینه که صفحه وب درست کنید.ESP32 پاسخ درخواست ها رو با چند تا کد HTML به مرورگر میفرسته تا صفحه وب رو بسازه.
صفحه وب به کاربر با دستور ()client.println ارسال میشه. اطلاعاتی که به کاربر باید ارسال بشه رو در ورودی این دستور قرار میدیم.
همیشه اولین چیزی که باید ارسال کنیم این خط کده که میگه ما داریم HTML میفرستیم.
<!DOCTYPE HTML><html>
این کد هم صفحه وب رو برای هر مرورگری در دسترس می کنه.
client.println("<head><meta name=\"viewport\" content=\"width=device-width, initial-scale=1\">");
این خط کد هم برای جلوگیری از درخواست برای فیو آیکونهاست.
client.println("<link rel=\"icon\" href=\"data:,\">");
شکل دهی صفحه وب
با یک سری حروف CSS صفحه وب وکلید ها رو شکل دهی می کنیم. از فونت Helvetica و نمایش متن در قسمت وسط صفحه تنظیمات رو تکمیل می کنیم.
client.println("<style>html { font-family: Helvetica; display: inline-block; margin: 0px auto; text-align: center;}");
رنگ کلید ها رو با #4CAF50 تعیین می کنیم . کلیدها بدون کادر و به رنگ سفید و با فرمت 16px 40px مشخص شدن. تنظیمات تکمیلی متن نوشته رو هم در خط بعدی مشخص کردیم.
client.println(".button { background-color: #4CAF50; border: none; color: white; padding: 16px 40px;");
client.println("text-decoration: none; font-size: 30px; margin: 2px; cursor: pointer;}");
همین مشخصات رو برای کلید off با رنگ متفاوت تنظیم می کنیم.
client.println(".button2 {background-color: #555555;}</style></head>");
تنظیم اولین سرفصل صفحه وب
با این کد تنظیمات سرفصل اول برای صفحه وب برای ESP32 تنظیم میشه. به جای ESP32 Web Server هر عبارت دیگه ای میتونه نوشته بشه.
// Web Page Heading
client.println("<h1>ESP32 Web Server</h1>");
نمایش کلیدها و وضعیت مربوط به کلیدها
تو یک پاراگراف با متغیر output26Stateوضعیت GPIO26 نمایش داده میشه وبا تغییر این متغیر وضعیت پین هم عوض میشه.
client.println("<p>GPIO 26 - State " + output26State + "</p>");
حالا بر اساس وضعیت فعلی GPIO کلید ON و یا Off نمایش داده میشه. اگه GPIO تو وضعیت Off باشه ، کلید ON و اگهGPIO تو وضعیت ON باشه کلید Off نمایش داده میشه.
if (output26State=="off") {
  client.println("<p><a href=\"/26/on\"><button class=\"button\">ON</button></a></p>");
} else {
  client.println("<p><a href=\"/26/off\"><button class=\"button button2\">OFF</button></a></p>");
}
همین روند رو برای GPIO27 هم تکرار می کنیم.
بستن اتصال
تو مرحله آخر وقتی که پاسخگویی به کاربرها انجام شد ، متغیر header رو میبندیم و ارتباط با کاربر رو با دستور ()client.stop تموم می کنیم.
// Clear the header variable
header = "";
// Close the connection
client.stop();
پایان آموزش راه اندازی وب سرور ESP32.
ماژول ESP32 دارای وای فای و بلوتوث
ماژول ESP32 دارای وای فای و بلوتوث