
این آموزش توابعی دیگری را برای کنترل صفحه نمایش OLED با MicroPython با استفاده از ESP32 یا ESP8266 نشان میدهد. شما یاد خواهید گرفت چگونه کل صفحه را عمودی یا افقی اسکرول و اشکالی را نیز رسم کنید.
پیشنیازها
برای دنبال کردن این آموزش نیاز دارید که فریمور میکروپایتون در برد ESP32/ESP8266 نصب باشد. همچنین برای نوشتن و آپلود کد در بردتان، به یک IDE نیاز دارید. ما پیشنهاد میکنیم از Thonny IDE یا uPyCraft IDE استفاده کنید.
قطعات مورد نیاز
لیستی از قطعاتی که در این پروژه به آنها نیاز دارید:
ESP32 یا ESP8266
نمایشگر OLED 0.96 inch
بردبرد
سیم جامپر
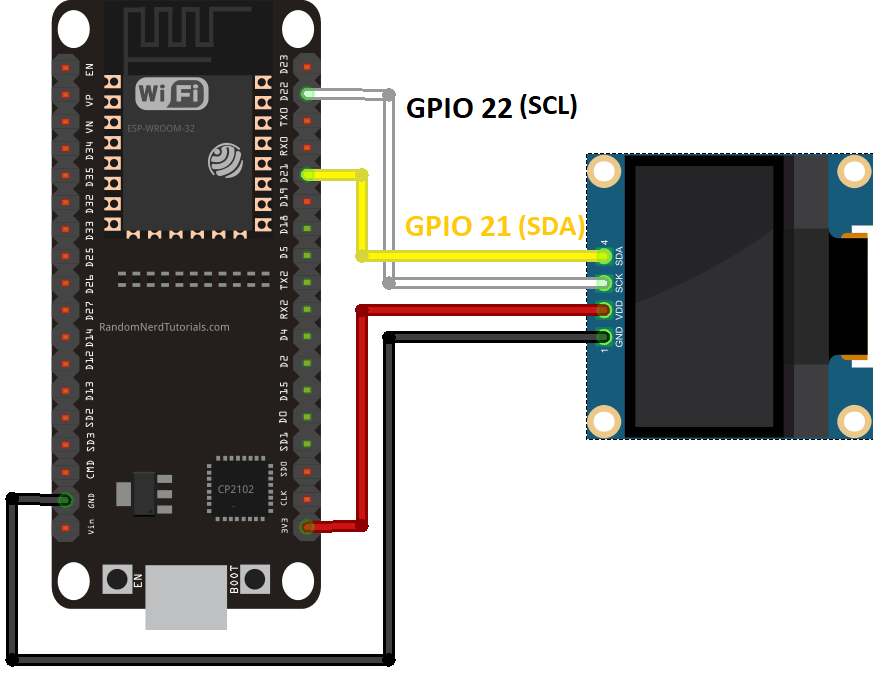
شماتیک – ESP32
اگر از برد ESP32 استفاده میکنید، دیاگرام شماتیک زیر را دنبال کنید.
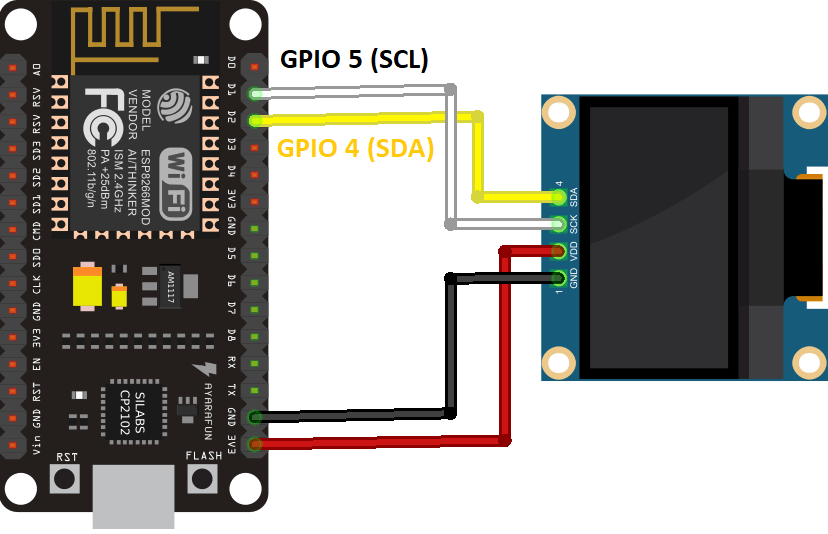
شماتیک ESP8266 NodeMCU
اگر از برد ESP8266 NodeMCU استفاده میکنید، دیاگرام شماتیک زیر را دنبال کنید.
کتابخانه SSD1306 OLED
کتابخانه برای نوشتن در نمایشگر OLED، به صورت پیشفرض قسمتی از کتابخانه استاندارد میکروپایتون نیست. پس نیاز دارید که این کتابخانه را در برد ESP32/ESP8266 آپلود کنید.
کتابخانه نمایشگر OLED :
#MicroPython SSD1306 OLED driver, I2C and SPI interfaces created by Adafruit

import time
import framebuf

# register definitions
SET_CONTRAST        = const(0x81)
SET_ENTIRE_ON       = const(0xa4)
SET_NORM_INV        = const(0xa6)
SET_DISP            = const(0xae)
SET_MEM_ADDR        = const(0x20)
SET_COL_ADDR        = const(0x21)
SET_PAGE_ADDR       = const(0x22)
SET_DISP_START_LINE = const(0x40)
SET_SEG_REMAP       = const(0xa0)
SET_MUX_RATIO       = const(0xa8)
SET_COM_OUT_DIR     = const(0xc0)
SET_DISP_OFFSET     = const(0xd3)
SET_COM_PIN_CFG     = const(0xda)
SET_DISP_CLK_DIV    = const(0xd5)
SET_PRECHARGE       = const(0xd9)
SET_VCOM_DESEL      = const(0xdb)
SET_CHARGE_PUMP     = const(0x8d)


class SSD1306:
    def __init__(self, width, height, external_vcc):
        self.width = width
        self.height = height
        self.external_vcc = external_vcc
        self.pages = self.height // 8
        # Note the subclass must initialize self.framebuf to a framebuffer.
        # This is necessary because the underlying data buffer is different
        # between I2C and SPI implementations (I2C needs an extra byte).
        self.poweron()
        self.init_display()

    def init_display(self):
        for cmd in (
            SET_DISP | 0x00, # off
            # address setting
            SET_MEM_ADDR, 0x00, # horizontal
            # resolution and layout
            SET_DISP_START_LINE | 0x00,
            SET_SEG_REMAP | 0x01, # column addr 127 mapped to SEG0
            SET_MUX_RATIO, self.height - 1,
            SET_COM_OUT_DIR | 0x08, # scan from COM[N] to COM0
            SET_DISP_OFFSET, 0x00,
            SET_COM_PIN_CFG, 0x02 if self.height == 32 else 0x12,
            # timing and driving scheme
            SET_DISP_CLK_DIV, 0x80,
            SET_PRECHARGE, 0x22 if self.external_vcc else 0xf1,
            SET_VCOM_DESEL, 0x30, # 0.83*Vcc
            # display
            SET_CONTRAST, 0xff, # maximum
            SET_ENTIRE_ON, # output follows RAM contents
            SET_NORM_INV, # not inverted
            # charge pump
            SET_CHARGE_PUMP, 0x10 if self.external_vcc else 0x14,
            SET_DISP | 0x01): # on
            self.write_cmd(cmd)
        self.fill(0)
        self.show()

    def poweroff(self):
        self.write_cmd(SET_DISP | 0x00)

    def contrast(self, contrast):
        self.write_cmd(SET_CONTRAST)
        self.write_cmd(contrast)

    def invert(self, invert):
        self.write_cmd(SET_NORM_INV | (invert & 1))

    def show(self):
        x0 = 0
        x1 = self.width - 1
        if self.width == 64:
            # displays with width of 64 pixels are shifted by 32
            x0 += 32
            x1 += 32
        self.write_cmd(SET_COL_ADDR)
        self.write_cmd(x0)
        self.write_cmd(x1)
        self.write_cmd(SET_PAGE_ADDR)
        self.write_cmd(0)
        self.write_cmd(self.pages - 1)
        self.write_framebuf()

    def fill(self, col):
        self.framebuf.fill(col)

    def pixel(self, x, y, col):
        self.framebuf.pixel(x, y, col)

    def scroll(self, dx, dy):
        self.framebuf.scroll(dx, dy)

    def text(self, string, x, y, col=1):
        self.framebuf.text(string, x, y, col)


class SSD1306_I2C(SSD1306):
    def __init__(self, width, height, i2c, addr=0x3c, external_vcc=False):
        self.i2c = i2c
        self.addr = addr
        self.temp = bytearray(2)
        # Add an extra byte to the data buffer to hold an I2C data/command byte
        # to use hardware-compatible I2C transactions.  A memoryview of the
        # buffer is used to mask this byte from the framebuffer operations
        # (without a major memory hit as memoryview doesn't copy to a separate
        # buffer).
        self.buffer = bytearray(((height // 8) * width) + 1)
        self.buffer[0] = 0x40  # Set first byte of data buffer to Co=0, D/C=1
        self.framebuf = framebuf.FrameBuffer1(memoryview(self.buffer)[1:], width, height)
        super().__init__(width, height, external_vcc)

    def write_cmd(self, cmd):
        self.temp[0] = 0x80 # Co=1, D/C#=0
        self.temp[1] = cmd
        self.i2c.writeto(self.addr, self.temp)

    def write_framebuf(self):
        # Blast out the frame buffer using a single I2C transaction to support
        # hardware I2C interfaces.
        self.i2c.writeto(self.addr, self.buffer)

    def poweron(self):
        pass


class SSD1306_SPI(SSD1306):
    def __init__(self, width, height, spi, dc, res, cs, external_vcc=False):
        self.rate = 10 * 1024 * 1024
        dc.init(dc.OUT, value=0)
        res.init(res.OUT, value=0)
        cs.init(cs.OUT, value=1)
        self.spi = spi
        self.dc = dc
        self.res = res
        self.cs = cs
        self.buffer = bytearray((height // 8) * width)
        self.framebuf = framebuf.FrameBuffer1(self.buffer, width, height)
        super().__init__(width, height, external_vcc)

    def write_cmd(self, cmd):
        self.spi.init(baudrate=self.rate, polarity=0, phase=0)
        self.cs.high()
        self.dc.low()
        self.cs.low()
        self.spi.write(bytearray([cmd]))
        self.cs.high()

    def write_framebuf(self):
        self.spi.init(baudrate=self.rate, polarity=0, phase=0)
        self.cs.high()
        self.dc.high()
        self.cs.low()
        self.spi.write(self.buffer)
        self.cs.high()

    def poweron(self):
        self.res.high()
        time.sleep_ms(1)
        self.res.low()
        time.sleep_ms(10)
        self.res.high()
با توجه به IDE که استفاده میکنید، دستورالعملهای زیر را دنبال کنید.
A. آپلود کتابخانه OLED با uPyCraft IDE
B. آپلود کتابخانه OLED با Thonny IDE
A. آپلود کتابخانه OLED با uPyCraft IDE
این قسمت به شما نشان میدهد چگونه یک کتابخانه را با uPyCraft IDE آپلود کنید.
۱- با کلیک بر روی گزینه New File یک فایل جدید ایجاد کنید.

۲- کد کتابخانه OLED را در این فایل کپی کنید.
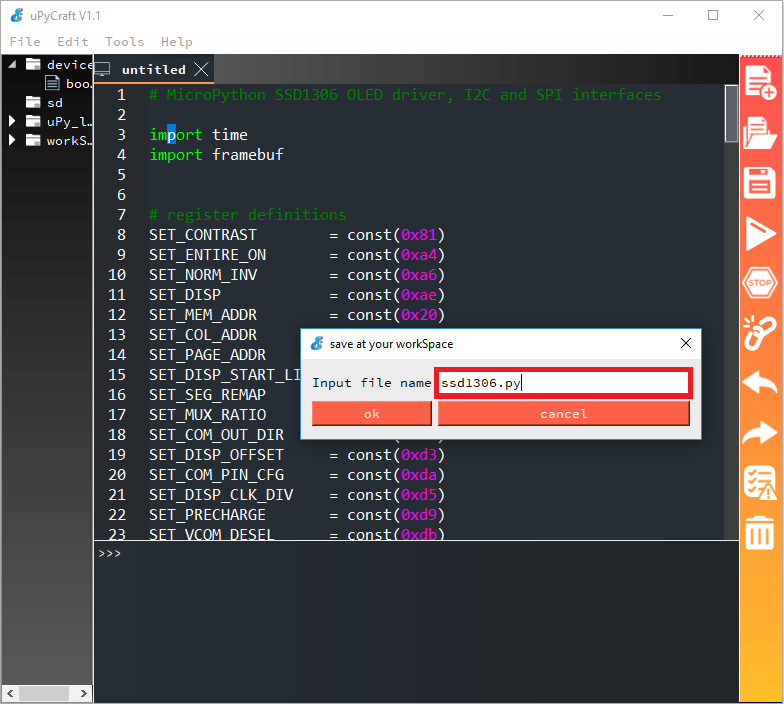
۳- پس از کپی کردن کد، برای ذخیره فایل روی گزینه Save کلیک کنید.

۴- این فایل را “ssd1306.py” بنامید و OK را فشار دهید.
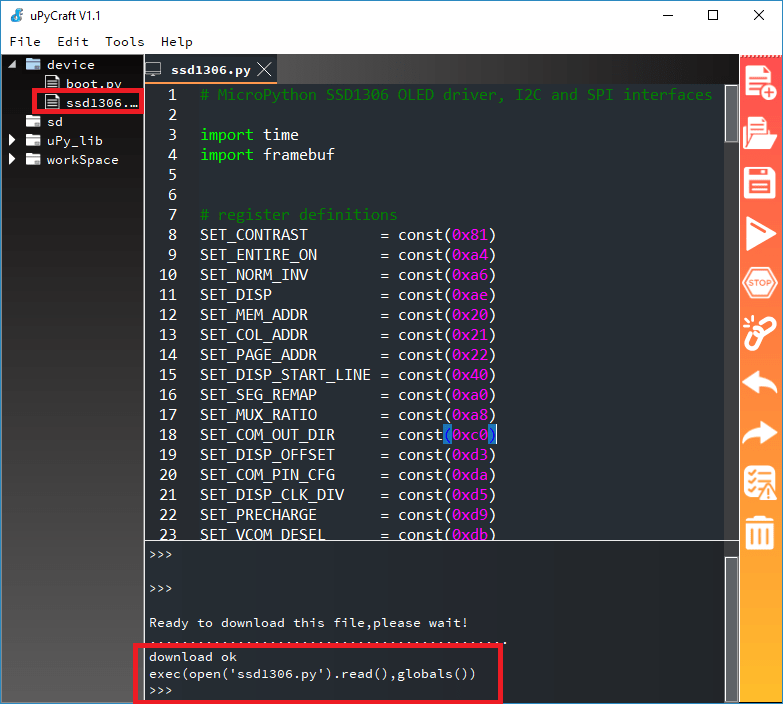
۵- روی گزینه Download and Run کلیک کنید.

همانطور که در شکل زیر مشخص شده، این فایل باید در پوشه دستگاه با نام “ssd1306.py” ذخیره شده باشد.
حال میتوانید با وارد کردن کتابخانه در بردتان، از قابلیتهای آن استفاده کنید.
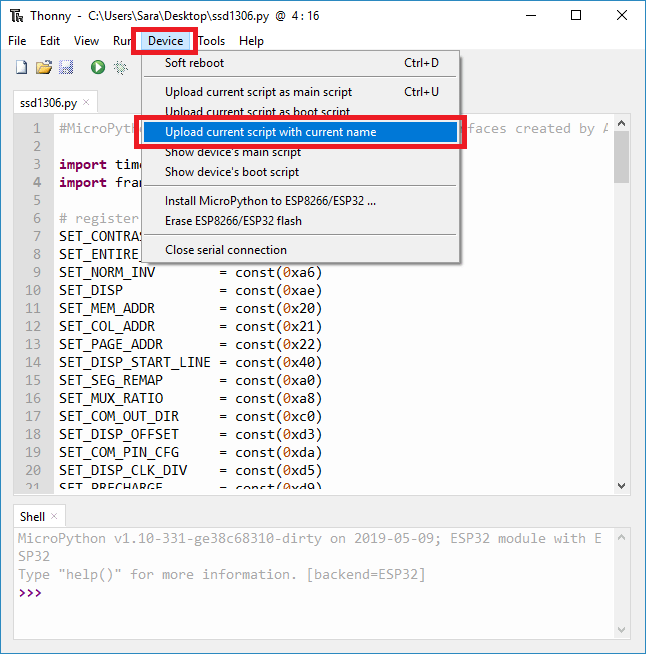
B. آپلود کتابخانه OLED با Thonny IDE
اگر از Thonny IDE استفاده میکنید، مراحل زیر را دنبال کنید.
۱- کد کتابخانه را در یک فایل جدید کپی کنید.
۲- این فایل را با نام ssd1306.py. ذخیره کنید.
۳- به مسیر زیر بروید.
Device > Upload current script with the current name
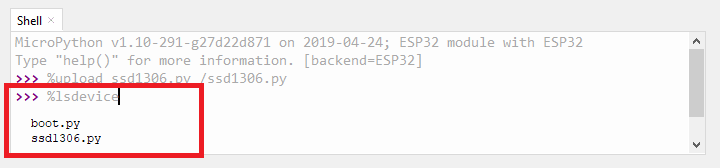
تمام! کتابخانه در برد شما آپلود شده است. برای اینکه مطمئن شوید کتابخانه با موفقیت آپلود شده است، عبارت زیر را در Shell تایپ کنید.
%lsdevice
این دستور فایلهایی که در بردتان ذخیره شده است را برمیگرداند. یکی از آنها باید ssd1306.py باشد.
پس از آپلود کتابخانه در بردتان، شما میتوانید با وارد کردن کتابخانه در کدتان، از قابلیتهای آن استفاده کنید.
توابع اسکرول در OLED با میکروپایتون
کتابخانه ss1306.py یک تابع به نام scroll(x, y) دارد. این تابع به تعداد x پیکسل به راست و y پیکسل به پایین اسکرول میکند.
اسکرول افقی صفحه OLED
گاهی اوقات نیاز دارید که یک صفحات مختلف را در نمایشگر OLED نمایش دهید. برای مثال، صفحه اول مقادیر خوانده شده از سنسور و صفحه دوم وضعیتهای GPIO را نمایش میدهند.
اسکرول افقی
تابع scroll_in_screen(screen) محتویات کل صفحه را از راست به چپ اسکرول میکند.
def scroll_in_screen(screen):
  for i in range (0, oled_width+1, 4):
    for line in screen:
      oled.text(line[2], -oled_width+i, line[1])
    oled.show()
    if i!= oled_width:
      oled.fill(0)
این تابع لیستی از لیستها را به عنوان آرگومان میپذیرد. برای مثال:
screen1 = [[0, 0 , screen1_row1], [0, 16, screen1_row2], [0, 32, screen1_row3]]
هر لیستی از لیست، شامل مختصات x و y و پیام است. [x, y, message]
به عنوان مثال، ما سه ردیف را در صفحه اول با پیغامهای زیر نمایش میدهیم.
screen1_row1 = "Screen 1, row 1"
screen1_row2 = "Screen 1, row 2"
screen1_row3 = "Screen 1, row 3"
سپس برای اسکرول صفحه از چپ به راست، نیاز است که تابع ()scroll_in_screen را صدا بزنید و لیستی ار لیستها را به عنوان آرگومان ارسال کنید.
scroll_in_screen(screen1)
خالی کردن صفحه به صورت افقی (اسکرول اوت کردن صفحه)
برای خالی کردن صفحه به صورت افقی، میتوانید از تابع scroll_out_screen(speed) استفاده کنید که کل صفحه نمایش را بی بیرون از OLED اسکرول میکند. این تابع عددی را به عنوان آرگومان میپذیرد که سرعت اسکرول کردن را مشخص میکند. سرعت باید مقسومعلیه عدد ۱۲۸ باشد. (oled_width)
def scroll_out_screen(speed):
  for i in range ((oled_width+1)/speed):
    for j in range (oled_height):
      oled.pixel(i, j, 0)
    oled.scroll(speed,0)
    oled.show()
حال شما میتوانید برای اسکرول کردن بین صفحات، از این دو تابع استفاده کنید. برای مثال :
scroll_in_screen(screen1)
scroll_out_screen(4)
scroll_in_screen(screen2)
scroll_out_screen(4)
اسکرول پیوسته افقی
اگر میخواهید صفحه به صورت پیوسته اسکرول شود و سپس خالی شود، میتوانید از تابع scroll_screen_in_out(screen) استفاده کنید.
def scroll_screen_in_out(screen):
  for i in range (0, (oled_width+1)*2, 1):
    for line in screen:
      oled.text(line[2], -oled_width+i, line[1])
    oled.show()
    if i!= oled_width:
      oled.fill(0)
شما میتوانید از این تابع برای اسکرول کردن بین صفحات یا برای اسکرول کردن مداوم یک صفحه استفاده کنید.
scroll_screen_in_out(screen1)
scroll_screen_in_out(screen2)
scroll_screen_in_out(screen3)
اسکرول عمودی صفحه OLED
از توابع مشابه برای اسکرول عمودی صفحه استفاده میکنیم.
اسکرول عمودی
تابع scroll_in_screen_v(screen) محتویات کل صفحه را عمودی اسکرول میکند.
def scroll_in_screen_v(screen):
  for i in range (0, (oled_height+1), 1):
    for line in screen:
      oled.text(line[2], line[0], -oled_height+i+line[1])
    oled.show()
    if i!= oled_height:
      oled.fill(0)
خالی کردن صفحه به صورت عمودی (اسکرول اوت کردن صفحه)
شما میتوانید از تابع scroll_out_screen_v(speed) برای خالی کردن صفحه به صورت عمودی استفاده کنید. مشابه تابع اسکرول افقی، این تابع نیز عددی را برای سرعت اسکرول به عنوان آرگومان میپذیرد. این عدد باید مقسومعلیه ۶۴ باشد.(oled_height)
def scroll_out_screen_v(speed):
  for i in range ((oled_height+1)/speed):
    for j in range (oled_width):
      oled.pixel(j, i, 0)
    oled.scroll(0,speed)
    oled.show()
اسکرول پیوسته عمودی
اگر میخواهید صفحه به صورت پیوسته اسکرول شود و سپس خالی شود، میتوانید از تابع scroll_in_out_screen_v(screen) استفاده کنید.
def scroll_screen_in_out_v(screen):
  for i in range (0, (oled_height*2+1), 1):
    for line in screen:
      oled.text(line[2], line[0], -oled_height+i+line[1])
    oled.show()
    if i!= oled_height:
      oled.fill(0)
اسکریپت اسکرول صفحه OLED در میکروپایتون
اسکریپت زیر همه توابعی را که قبلاً توضیح دادیم اعمال میکند. برای مشاهده همه جلوههای اسکرول، میتوانید کد زیر را در برد خود آپلود کنید.
from machine import Pin, SoftI2C
import ssd1306
from time import sleep

# ESP32 Pin assignment
i2c = SoftI2C(scl=Pin(22), sda=Pin(21))

# ESP8266 Pin assignment
#i2c = SoftI2C(scl=Pin(5), sda=Pin(4))

oled_width = 128
oled_height = 64
oled = ssd1306.SSD1306_I2C(oled_width, oled_height, i2c)

screen1_row1 = "Screen 1, row 1"
screen1_row2 = "Screen 1, row 2"
screen1_row3 = "Screen 1, row 3"

screen2_row1 = "Screen 2, row 1"
screen2_row2 = "Screen 2, row 2"

screen3_row1 = "Screen 3, row 1"

screen1 = [[0, 0 , screen1_row1], [0, 16, screen1_row2], [0, 32, screen1_row3]]
screen2 = [[0, 0 , screen2_row1], [0, 16, screen2_row2]]
screen3 = [[0, 40 , screen3_row1]]

# Scroll in screen horizontally from left to right
def scroll_in_screen(screen):
  for i in range (0, oled_width+1, 4):
    for line in screen:
      oled.text(line[2], -oled_width+i, line[1])
    oled.show()
    if i!= oled_width:
      oled.fill(0)

# Scroll out screen horizontally from left to right
def scroll_out_screen(speed):
  for i in range ((oled_width+1)/speed):
    for j in range (oled_height):
      oled.pixel(i, j, 0)
    oled.scroll(speed,0)
    oled.show()

# Continuous horizontal scroll
def scroll_screen_in_out(screen):
  for i in range (0, (oled_width+1)*2, 1):
    for line in screen:
      oled.text(line[2], -oled_width+i, line[1])
    oled.show()
    if i!= oled_width:
      oled.fill(0)

# Scroll in screen vertically
def scroll_in_screen_v(screen):
  for i in range (0, (oled_height+1), 1):
    for line in screen:
      oled.text(line[2], line[0], -oled_height+i+line[1])
    oled.show()
    if i!= oled_height:
      oled.fill(0)

# Scroll out screen vertically
def scroll_out_screen_v(speed):
  for i in range ((oled_height+1)/speed):
    for j in range (oled_width):
      oled.pixel(j, i, 0)
    oled.scroll(0,speed)
    oled.show()

# Continous vertical scroll
def scroll_screen_in_out_v(screen):
  for i in range (0, (oled_height*2+1), 1):
    for line in screen:
      oled.text(line[2], line[0], -oled_height+i+line[1])
    oled.show()
    if i!= oled_height:
      oled.fill(0)

while True:

  # Scroll in, stop, scroll out (horizontal)
  scroll_in_screen(screen1)
  sleep(2)
  scroll_out_screen(4)

  scroll_in_screen(screen2)
  sleep(2)
  scroll_out_screen(4)

  scroll_in_screen(screen3)
  sleep(2)
  scroll_out_screen(4)

  # Continuous horizontal scroll
  scroll_screen_in_out(screen1)
  scroll_screen_in_out(screen2)
  scroll_screen_in_out(screen3)

  # Scroll in, stop, scroll out (vertical)
  scroll_in_screen_v(screen1)
  sleep(2)
  scroll_out_screen_v(4)

  scroll_in_screen_v(screen2)
  sleep(2)
  scroll_out_screen_v(4)

  scroll_in_screen_v(screen3)
  sleep(2)
  scroll_out_screen_v(4)

  # Continuous verticall scroll
  scroll_screen_in_out_v(screen1)
  scroll_screen_in_out_v(screen2)
  scroll_screen_in_out_v(screen3)
رسم اشکال در OLED با میکروپایتون
برای رسم اشکال در نمایشگر OLED با میکروپایتون، ما از کتابخانه Adafruit_GFX MicroPython استفاده میکنیم.
کتابخانه Adafruit GFX
برای رسم اشکال در نمایشگر OLED، ما از کتابخانه Adafruit GFX استفاده خواهیم کرد. این کتابخانه، به صورت پیشفرض قسمتی از کتابخانه استاندارد میکروپایتون نیست. بنابراین نیاز است که این کتابخانه را در برد خود آپلود کنید.
کتابخانه Adafruit GFX:
# Port of Adafruit GFX Arduino library to MicroPython.
# Based on: https://github.com/adafruit/Adafruit-GFX-Library
# Author: Tony DiCola (original GFX author Phil Burgess)
# License: MIT License (https://opensource.org/licenses/MIT)

class GFX:

    def __init__(self, width, height, pixel, hline=None, vline=None):
        # Create an instance of the GFX drawing class.  You must pass in the
        # following parameters:
        #  - width = The width of the drawing area in pixels.
        #  - height = The height of the drawing area in pixels.
        #  - pixel = A function to call when a pixel is drawn on the display.
        #            This function should take at least an x and y position
        #            and then any number of optional color or other parameters.
        #  You can also provide the following optional keyword argument to
        #  improve the performance of drawing:
        #  - hline = A function to quickly draw a horizontal line on the display.
        #            This should take at least an x, y, and width parameter and
        #            any number of optional color or other parameters.
        #  - vline = A function to quickly draw a vertical line on the display.
        #            This should take at least an x, y, and height paraemter and
        #            any number of optional color or other parameters.
        self.width = width
        self.height = height
        self._pixel = pixel
        # Default to slow horizontal & vertical line implementations if no
        # faster versions are provided.
        if hline is None:
            self.hline = self._slow_hline
        else:
            self.hline = hline
        if vline is None:
            self.vline = self._slow_vline
        else:
            self.vline = vline

    def _slow_hline(self, x0, y0, width, *args, **kwargs):
        # Slow implementation of a horizontal line using pixel drawing.
        # This is used as the default horizontal line if no faster override
        # is provided.
        if y0 < 0 or y0 > self.height or x0 < -width or x0 > self.width:
            return
        for i in range(width):
            self._pixel(x0+i, y0, *args, **kwargs)

    def _slow_vline(self, x0, y0, height, *args, **kwargs):
        # Slow implementation of a vertical line using pixel drawing.
        # This is used as the default vertical line if no faster override
        # is provided.
        if y0 < -height or y0 > self.height or x0 < 0 or x0 > self.width:
            return
        for i in range(height):
            self._pixel(x0, y0+i, *args, **kwargs)

    def rect(self, x0, y0, width, height, *args, **kwargs):
        # Rectangle drawing function.  Will draw a single pixel wide rectangle
        # starting in the upper left x0, y0 position and width, height pixels in
        # size.
        if y0 < -height or y0 > self.height or x0 < -width or x0 > self.width:
            return
        self.hline(x0, y0, width, *args, **kwargs)
        self.hline(x0, y0+height-1, width, *args, **kwargs)
        self.vline(x0, y0, height, *args, **kwargs)
        self.vline(x0+width-1, y0, height, *args, **kwargs)

    def fill_rect(self, x0, y0, width, height, *args, **kwargs):
        # Filled rectangle drawing function.  Will draw a single pixel wide
        # rectangle starting in the upper left x0, y0 position and width, height
        # pixels in size.
        if y0 < -height or y0 > self.height or x0 < -width or x0 > self.width:
            return
        for i in range(x0, x0+width):
            self.vline(i, y0, height, *args, **kwargs)

    def line(self, x0, y0, x1, y1, *args, **kwargs):
        # Line drawing function.  Will draw a single pixel wide line starting at
        # x0, y0 and ending at x1, y1.
        steep = abs(y1 - y0) > abs(x1 - x0)
        if steep:
            x0, y0 = y0, x0
            x1, y1 = y1, x1
        if x0 > x1:
            x0, x1 = x1, x0
            y0, y1 = y1, y0
        dx = x1 - x0
        dy = abs(y1 - y0)
        err = dx // 2
        ystep = 0
        if y0 < y1:
            ystep = 1
        else:
            ystep = -1
        while x0 <= x1:
            if steep:
                self._pixel(y0, x0, *args, **kwargs)
            else:
                self._pixel(x0, y0, *args, **kwargs)
            err -= dy
            if err < 0:
                y0 += ystep
                err += dx
            x0 += 1

    def circle(self, x0, y0, radius, *args, **kwargs):
        # Circle drawing function.  Will draw a single pixel wide circle with
        # center at x0, y0 and the specified radius.
        f = 1 - radius
        ddF_x = 1
        ddF_y = -2 * radius
        x = 0
        y = radius
        self._pixel(x0, y0 + radius, *args, **kwargs)
        self._pixel(x0, y0 - radius, *args, **kwargs)
        self._pixel(x0 + radius, y0, *args, **kwargs)
        self._pixel(x0 - radius, y0, *args, **kwargs)
        while x < y:
            if f >= 0:
                y -= 1
                ddF_y += 2
                f += ddF_y
            x += 1
            ddF_x += 2
            f += ddF_x
            self._pixel(x0 + x, y0 + y, *args, **kwargs)
            self._pixel(x0 - x, y0 + y, *args, **kwargs)
            self._pixel(x0 + x, y0 - y, *args, **kwargs)
            self._pixel(x0 - x, y0 - y, *args, **kwargs)
            self._pixel(x0 + y, y0 + x, *args, **kwargs)
            self._pixel(x0 - y, y0 + x, *args, **kwargs)
            self._pixel(x0 + y, y0 - x, *args, **kwargs)
            self._pixel(x0 - y, y0 - x, *args, **kwargs)

    def fill_circle(self, x0, y0, radius, *args, **kwargs):
        # Filled circle drawing function.  Will draw a filled circule with
        # center at x0, y0 and the specified radius.
        self.vline(x0, y0 - radius, 2*radius + 1, *args, **kwargs)
        f = 1 - radius
        ddF_x = 1
        ddF_y = -2 * radius
        x = 0
        y = radius
        while x < y:
            if f >= 0:
                y -= 1
                ddF_y += 2
                f += ddF_y
            x += 1
            ddF_x += 2
            f += ddF_x
            self.vline(x0 + x, y0 - y, 2*y + 1, *args, **kwargs)
            self.vline(x0 + y, y0 - x, 2*x + 1, *args, **kwargs)
            self.vline(x0 - x, y0 - y, 2*y + 1, *args, **kwargs)
            self.vline(x0 - y, y0 - x, 2*x + 1, *args, **kwargs)

    def triangle(self, x0, y0, x1, y1, x2, y2, *args, **kwargs):
        # Triangle drawing function.  Will draw a single pixel wide triangle
        # around the points (x0, y0), (x1, y1), and (x2, y2).
        self.line(x0, y0, x1, y1, *args, **kwargs)
        self.line(x1, y1, x2, y2, *args, **kwargs)
        self.line(x2, y2, x0, y0, *args, **kwargs)

    def fill_triangle(self, x0, y0, x1, y1, x2, y2, *args, **kwargs):
        # Filled triangle drawing function.  Will draw a filled triangle around
        # the points (x0, y0), (x1, y1), and (x2, y2).
        if y0 > y1:
            y0, y1 = y1, y0
            x0, x1 = x1, x0
        if y1 > y2:
            y2, y1 = y1, y2
            x2, x1 = x1, x2
        if y0 > y1:
            y0, y1 = y1, y0
            x0, x1 = x1, x0
        a = 0
        b = 0
        y = 0
        last = 0
        if y0 == y2:
            a = x0
            b = x0
            if x1 < a:
                a = x1
            elif x1 > b:
                b = x1
            if x2 < a:
                a = x2
            elif x2 > b:
                b = x2
            self.hline(a, y0, b-a+1, *args, **kwargs)
            return
        dx01 = x1 - x0
        dy01 = y1 - y0
        dx02 = x2 - x0
        dy02 = y2 - y0
        dx12 = x2 - x1
        dy12 = y2 - y1
        if dy01 == 0:
            dy01 = 1
        if dy02 == 0:
            dy02 = 1
        if dy12 == 0:
            dy12 = 1
        sa = 0
        sb = 0
        if y1 == y2:
            last = y1
        else:
            last = y1-1
        for y in range(y0, last+1):
            a = x0 + sa // dy01
            b = x0 + sb // dy02
            sa += dx01
            sb += dx02
            if a > b:
                a, b = b, a
            self.hline(a, y, b-a+1, *args, **kwargs)
        sa = dx12 * (y - y1)
        sb = dx02 * (y - y0)
        while y <= y2:
            a = x1 + sa // dy12
            b = x0 + sb // dy02
            sa += dx12
            sb += dx02
            if a > b:
                a, b = b, a
            self.hline(a, y, b-a+1, *args, **kwargs)
            y += 1
برای نصب کتابخانه از دستورالعملهای آموزشهای قبلی (ولی برای کتابخانه GFX) استفاده کنید. کتابخانه GFX را به عنوان gfx.py ذخیره کنید. پس از آن میتوانید با وارد کردن کتابخانه از قابلیتهای آن استفاده کنید.
به طور خلاصه، نحوه رسم اشکال در اینجا آمده است. ابتدا نیاز دارید که کتابخانههای ssd1306 و gfx را و همچنین ماژول های Pin و SoftI2C را وارد کنید.
from machine import Pin, SoftI2C
import ssd1306
from time import sleep
import gfx
سپس، پینها را برای ESP32 تعریف کنید.
i2c = SoftI2C(scl=Pin(22), sda=Pin(21))
اگر از برد ESP8266 استفاده میکنید، از پینهای زیر استفاده کنید.
i2c = SoftI2C(scl=Pin(5), sda=Pin(4))
ما از یک نمایشگر OLED 128×۶۴ استفاده میکنیم. اگر شما از یک نمایشگر OLED با ابعاد متفاوت استفاده میکنید، آن را در خطوط زیر تغییر دهید:
oled_width = 128
oled_height = 64
یک آبجکت ss1306 که oled نام دارد، ایجاد کنید.
oled = ssd1306.SSD1306_I2C(oled_width, oled_height, i2c)
سپس نیاز داریم که یک شی gfx برای رسم اشکال ایجاد کنیم. در اینجا آن را graphics مینامیم که عرض و ارتفاع ناحیه رسم را به عنوان آرگومان در نظر میگیرد. در اینجا ما میخواهیم در کل صفحه رسم کنیم پس طول و عرض OLED را به عنوان آرگومان ارسال میکنیم. همچنین باید به عنوان آرگومان، یکی از تابعهای صفحه نمایش را که پیکسلها را ترسیم میکند، ارسال کنیم. در اینجا oled.pixel است.
graphics = gfx.GFX(oled_width, oled_height, oled.pixel)
سپس، میتوانید در کنار نمایش اشکال، از توابع ترسیم که به شما نشان میدهیم، استفاده کنید.
رسم یک خط
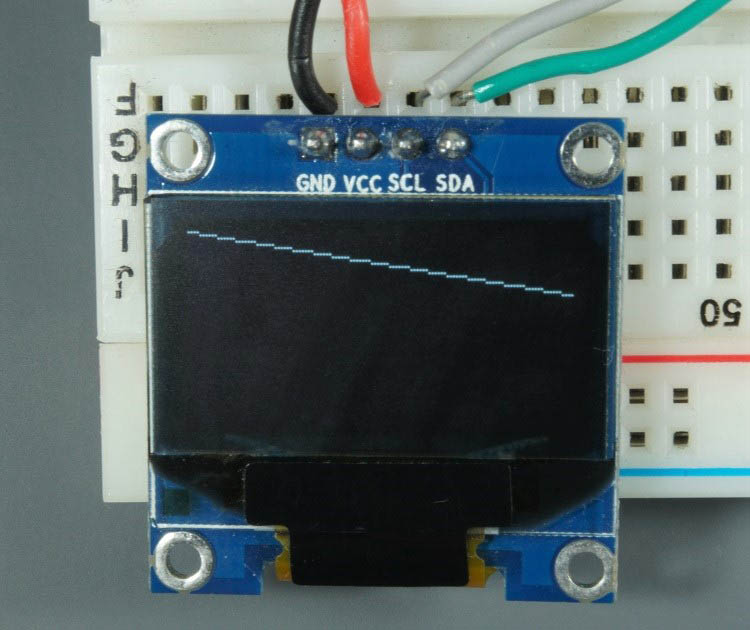
از متد line(x0, y0, x1, y1, color) درشی gfx برای ایجاد یک خط ایجاد کنید. مختصات (x0, y0) ابتدای خط و مختصات (x1, y1) انتهای خط را مشخص میکنند. برای نمایش واقعی اشکال در OLED، همیشه باید ()oled.show را فراخوانی کنید. برای مثال:
graphics.line(0, 0, 127, 20, 1)
oled.show()
مستطیل
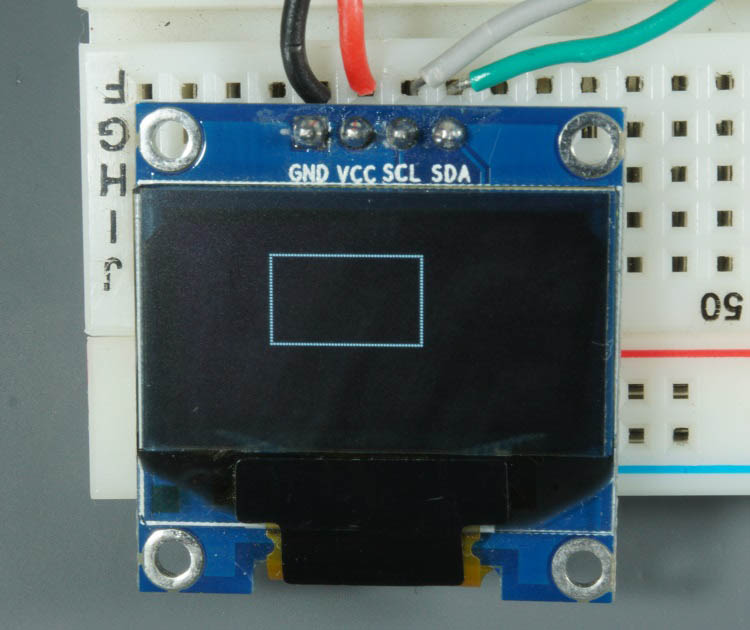
برای رسم یک مستطیل میتوانیداز متد rect(x0, y0, width, height, color) در آبجکت gfx استفاده کنید. مختصات (x0, y0) گوشه بالا سمت چپ مستطیل را مشخص میکنید. سپس نیاز دارید که طول و عرض و رنگ مستطیل را مشخص کنید. برای مثال:
graphics.rect(10, 10, 50, 30, 1)
oled.show()
مستطیل توپر
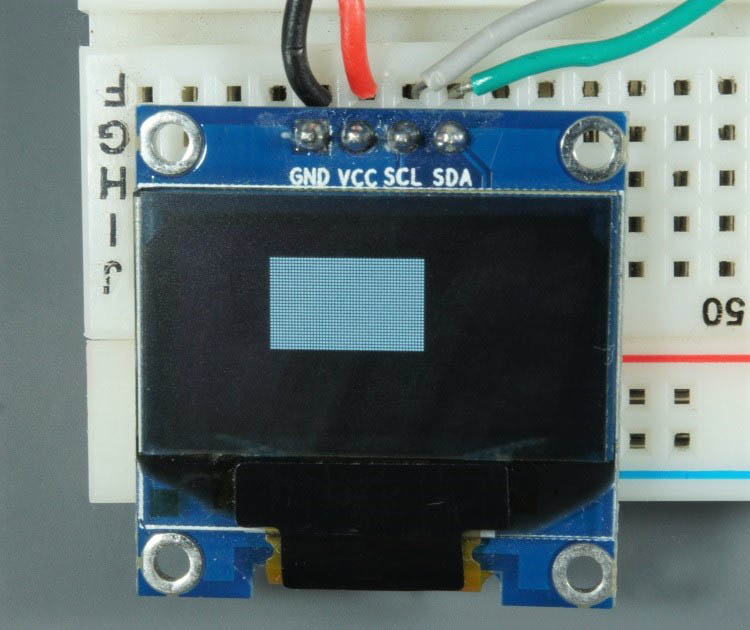
شما میتوانید از متدfill_rect(x0, y0, width, height, color) برای رسم یک مستطیل توپر استفاده کنید. این متد همان آرگومانهای ()drawRect را میپذیرد.
graphics.rect(10, 10, 50, 30, 1)
oled.show()
دایره
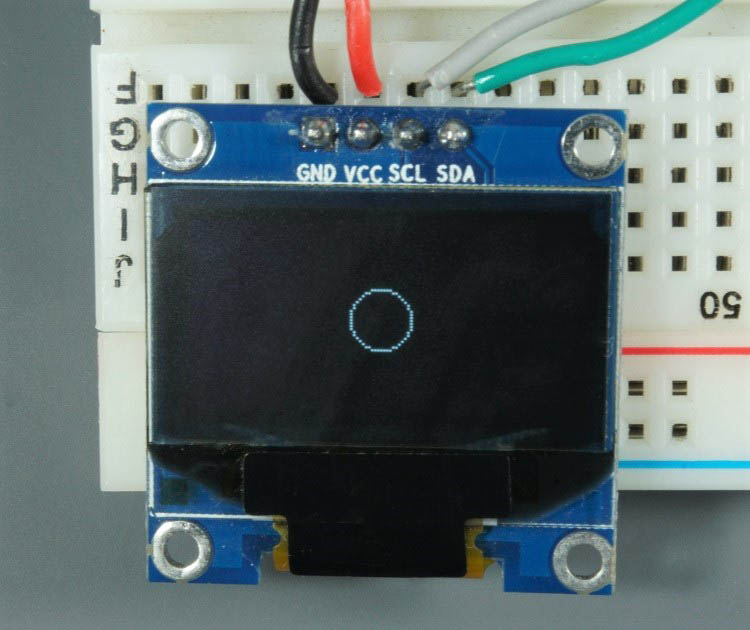
با استفاده از متد circle(x0, y0, radius, color) میتوانید یک دایره رسم کنید. مختصات (x0, y0) مرکز دایره را مشخص میکند. برای مثال:
graphics.circle(64, 32, 10, 1)
oled.show()
دایره توپر
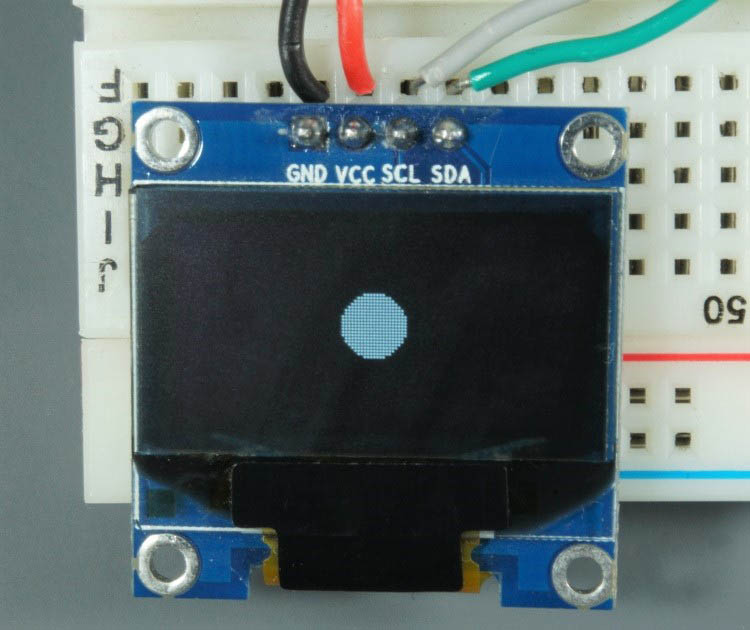
با استفاده از متد fill_circle(x0, y0, radius, color) میتوانید یک دایره توپر رسم کنید.
graphics.fill_circle(64, 32, 10, 1)
oled.show()
مثلث
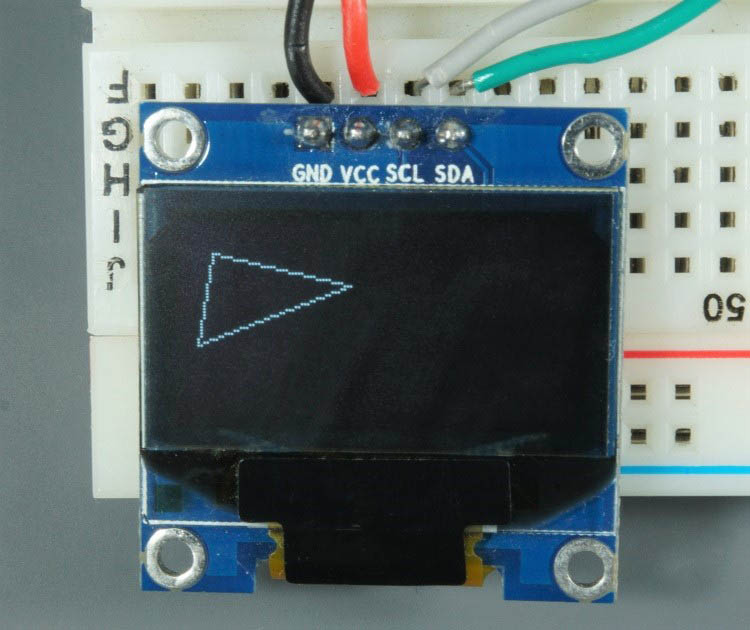
متد (x0, y0, x1, y1, x2, y2, color) برای رسم مثلث است. این متد مختصات هر راس و رنگ مثلث را به عنوان آرگومان میپذیرد.
graphics.triangle(10,10,55,20,5,40,1)
oled.show()
مثلث توپر
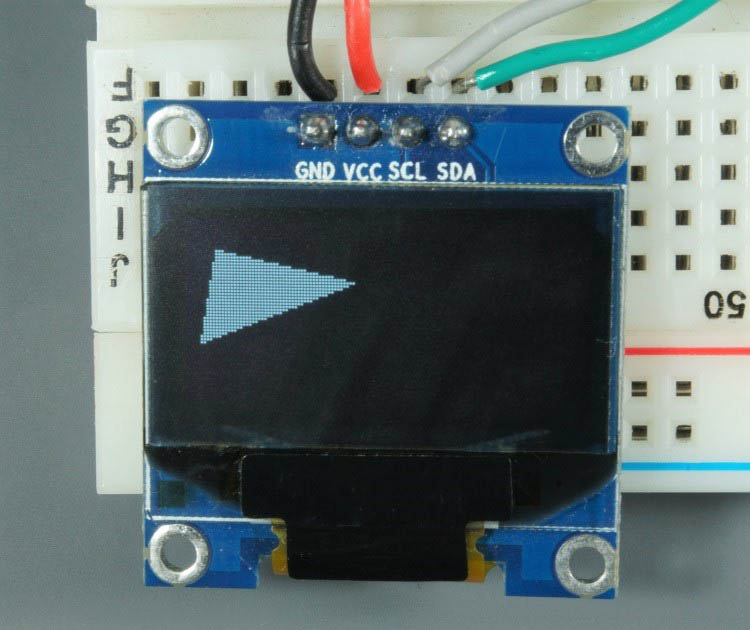
از متد fill_triangle(x0, y0, x1, y1, x2, y2, color) میتوانید برای رسم یک مثلث توپر استفاده کنید.
graphics.fill_triangle(10,10,55,20,5,40,1)
oled.show()
اسکریپت میکروپایتون – رسم اشکال
اسکریپت زیر همه روشهای ترسیم که قبلاً نشان داده شده است را پیادهسازی میکند.
from machine import Pin, SoftI2C
import ssd1306
from time import sleep
import gfx

# ESP32 Pin assignment
i2c = SoftI2C(scl=Pin(22), sda=Pin(21))

# ESP8266 Pin assignment
#i2c = SoftI2C(scl=Pin(5), sda=Pin(4))

oled_width = 128
oled_height = 64
oled = ssd1306.SSD1306_I2C(oled_width, oled_height, i2c)

graphics = gfx.GFX(oled_width, oled_height, oled.pixel)

while True:

  graphics.line(0, 0, 127, 20, 1)
  oled.show()
  sleep(1)
  oled.fill(0)

  graphics.rect(10, 10, 50, 30, 1)
  oled.show()
  sleep(1)
  oled.fill(0)

  graphics.fill_rect(10, 10, 50, 30, 1)
  oled.show()
  sleep(1)
  oled.fill(0)


  graphics.circle(64, 32, 10, 1)
  oled.show()
  sleep(1)
  oled.fill(0)

  graphics.fill_circle(64, 32, 10, 1)
  oled.show()
  sleep(1)
  oled.fill(0)

  graphics.triangle(10,10,55,20,5,40,1)
  oled.show()
  sleep(1)
  oled.fill(0)

  graphics.fill_triangle(10,10,55,20,5,40,1)
  oled.show()
  sleep(1)
  oled.fill(0)
جمعبندی
در این آموزش شما یاد گرفتید که از توابع پیشرفته برای اسکرول کردن صفحه OLED و رسم اشکال با استفاده از میکروپایتون و با برد ESP32/ESP8266 استفاده کنید. برای رسم اشکال، نیاز دارید که کتابخانه میکروپایتون Adafruit GFX را وارد کنید.
امیدواریم این آموزش برای شما مفید بوده باشد.